Map Editing
Map editing documentation for Empty Clip
Configuration for Linux systems
See the README file for instructions on cloning the repository and building.
To access the map editor, the game must be built with the map editing flag. E.g.
ENABLE_EDITOR=1 ./build.sh
Open the map editor:
cd working && ./emptyclip -editor
Editing Basics
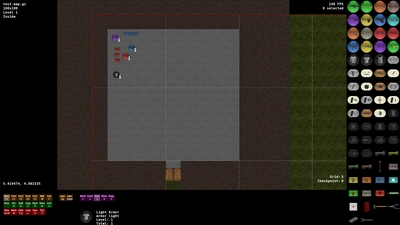
After opening the editor, you'll be presented with a screen that has a 3D view of the map, a palette window on the right, and a command window at the bottom.

Basic Controls
Press Left-click to place objects and draw blocks.
Press Middle-click to select and move objects/blocks.
Press Right-click to pan the camera around.
Use the Scroll Wheel to zoom in and out. Hold Shift to zoom faster.
Blocks
Blocks are the basic building pieces for the game. Blocks are placed in various layers that determine rendering order and other properties.
Base Layer
The base layer block is usually placed first and represents the theme of the level. Base layer blocks are special in that they don't write to the depth buffer (more on this later).
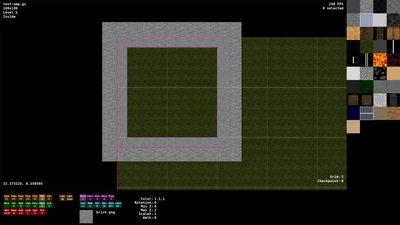
- Press F1 to select the Base layer
- Click the grass texture in the palette window
- Hold Shift and use the Scroll Wheel to zoom out quickly so the entire map is visible
- Click and Drag a box around the entire map

At this point you can press T to test the level. Press Escape to return to the editor.
Press S, type in a short name, then press Enter to save the map.
Walls
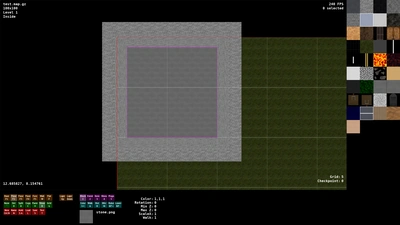
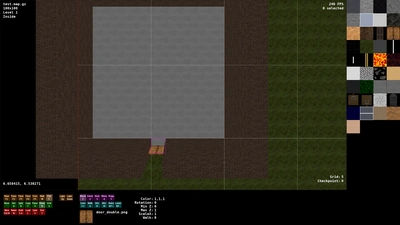
Zoom back into the top-left corner of the map, then press W to switch to the Wall layer. Next, click on the brick texture in the palette window, then Click and Drag in the 3D viewport to create a wall.
To see blocks easier, press B to highlight all blocks in the active layer. If you make a mistake, you can select the block by pressing Middle-click, then D to delete it.
Blocks can be moved by Middle-clicking and dragging the block.
Try creating four walls as seen in the figure.
Floors
Press F2 to switch to the first floor layer. Select the stone texture and create a block that covers the inside the new building.
Colors
Press W to switch back to the Wall layer, then drag a selection box around all four walls with Middle-click. Next press Shift+C to open the color name input box. Type the word brick, then press Enter.

Custom colors can be added to the tables/colors.tsv file.
The brush color can be changed when no blocks are selected. Press Grave to deselect all blocks, then press Shift+C to set the brush color. All new blocks will use this color.
Doors
Select the bottom wall with Middle-click, then hover your mouse somewhere in the middle of it and press X to split. Select one of the newly created wall blocks, then split it again so that a 1x1 wall is created. There should be three blocks as shown in the figure.
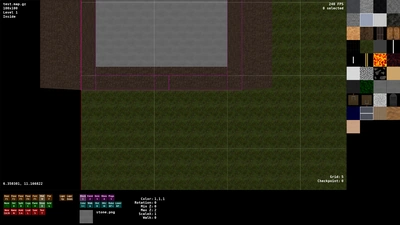
Select the 1x1 wall and delete it by pressing D.
Next, press F2 to switch to the first floor layer, then select the stone floor block. Press the Down Arrow key to extend the block downwards so that it covers the grass texture. Holding Shift causes the block to shrink in the direction pressed.
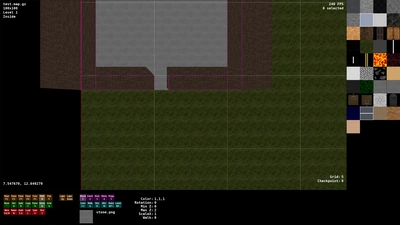
Press F to select the Flat Wall layer. Next, click on the double door texture from the palette, then create a 1x1 block in the empty wall space as shown in the figure.
With the Flat Wall layer still selected, press 2 to switch to event mode. Next, click DOOR from the palette window, then click the door block in the 3D viewport to create a door event.

When an event is selected, the green outline shows the affected blocks and the red squares denote which collision tiles change after the event is triggered.
Flat blocks can be rotated by pressing R.
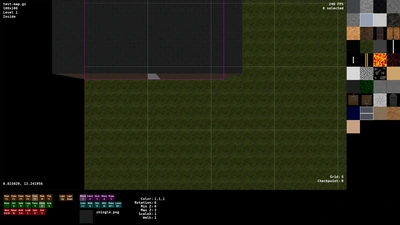
Foreground
Foreground blocks can be used to obstruct vision until the player is directly beneath them.
Press 1 to switch back to block mode, then press F5 to switch to the foreground layer.
Select the shingle texture from the palette, then draw a block around the building. Select the new block, then press Keypad Minus to lower the Max Z value to 2, matching the wall height. The block attributes are shown in the command window below.
Alternatively, hold Ctrl and use the Scroll Wheel to change the Max Z value.
You can increase the size of a selected block with the Arrow Keys, or Shift+Arrow Keys to decrease.
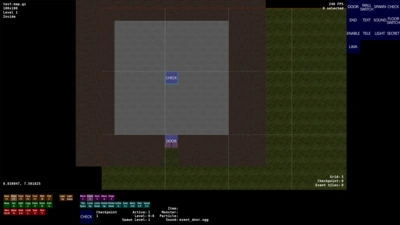
Starting Position
The starting location for the player is determined by the first checkpoint event. Press 2 to switch to event mode, then select CHECK from the event palette.
Switch to a floor layer (so that the inside is visible), then click somewhere in the building to place the event.
Spawning Monsters
Spawn events are used to summon monsters or other objects. Switch to event mode and select the SPAWN event. Create a 3x1 spawn event right outside the door.
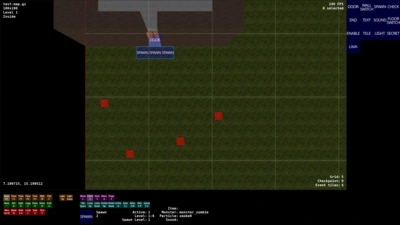
Select the new spawn event, then press Spacebar to create spawn points at the location of your mouse cursor.
There are two methods for setting which monster to spawn. With the event selected, either:
- Press Shift+M, then set
monster_zombieas the monster id - Press 4 to switch to monster mode, then Right-click the zombie in the palette to automatically set the monster id for the event.
Gear
Press 3 to select item mode, then click on a weapon in the palette. Next, click somewhere in the building to create weapons for your player.
Alternatively, press 4 to select monster mode, then click on a weapon crate. Create a few crates in the house, which will give your player some random weapons.
The palette window can be scrolled using the Scroll Wheel when the mouse is hovering over it.
Props
Press 5 to select prop mode, then click on a prop in the palette. Click to place a few props outside the building.
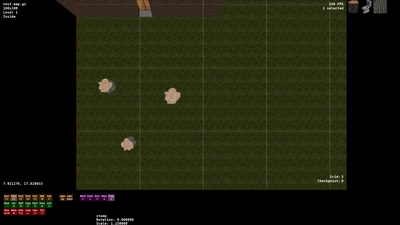
Selected props can be rotated by pressing R, while the size can be changed with Ctrl+Scroll Wheel.
Try testing the level and killing the zombies!
Events
Events are used to dynamically change the world or trigger certain actions. Events have many parameters:
- Active - Determines if the event can be triggered or not
- Level - The number of times an event can trigger
- Period - The time in seconds between between event triggers
- Spawn Level - The level of spawned objects
- Item ID - An item identifier or general use identifier
- Monster ID - A monster identifier used for spawning
- Particle ID - Determines the particle used for certain events
- Sound ID - Determines the sound played when certain events are triggered
- Tiles - Determines which tiles in the world are affected by the event
Checkpoint
The CHECK event can be used to determine starting location and other spawn points when the player dies.
Press the Level Up or Level Down buttons to change a selected checkpoint's level. Level 0 is reserved for the starting location. The player will only activate checkpoints higher than their last checkpoint level, which resets after the map is completed. All levels higher than zero act as a checkpoint when the player touches the event. If you want the player to spawn at random locations, press Spacebar to specify possible spawn tiles for the selected event, otherwise the player will spawn at the top-left corner of the event boundary.
Press - and = to change the testing checkpoint level (shown in the bottom right of the 3D Viewport). This let's you easily jump to various checkpoints throughout the map. You can also press Shift+T to test the level at the location of the mouse cursor.
You may find yourself wanting to insert a checkpoint somewhere between existing checkpoint levels. Instead of increasing each checkpoint's level by one to make room for the new event, hold Ctrl while clicking Level Up to increase all checkpoint levels that occur after the selected event.
Door
The DOOR event allows walls to be opened. They can be applied to any layer, but are usually applied to flat layer blocks.
Like the various switch events, the block's texture will swap to its alternate texture if it exists. Alternate textures are set by Right-clicking the desired texture in the palette.
A door can be made to require a key by setting the Item ID to the required key item. Like spawn events, you can easily set the identifier for a selected event by pressing 3, then Right-clicking the desired key in the item palette.
If the wall is bigger than 1x1, each event tile will need to be set manually with Spacebar. For example:
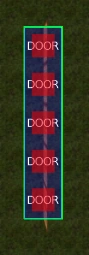
Enable
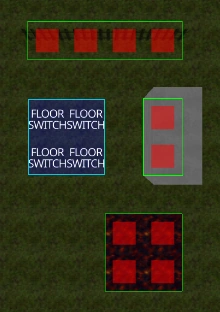
The ENABLE event changes the active state of other events.
When the player walks over the enable event, any events associated with it will toggle their active flag. The association is set with Spacebar, giving a yellow outline to the event.
Press A to toggle the active state of an event.
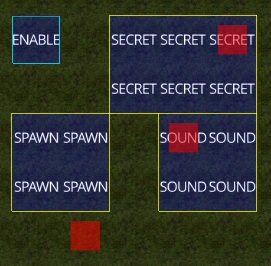
In the following figure, the enable event is tied to three different events. After the association is made, the event can be freely moved (as shown by the spawn event).
End
The END event indicates the end of the level or campaign.
To specify the next map to load, set the map filename in the Item ID attribute. If the Item ID is blank, the campaign will end and the player's progression will increase.
The first level of the campaign is defined in the assets/source/stats/campaign.tsv file.
Floor Switch
The FLOOR SWITCH event modifies blocks when the player walks over it.
The blocks and tiles to be modified are specified with Spacebar when the event is selected. Shift+Spacebar only adds tiles, while Ctrl+Spacebar only removes them. Make sure the correct block layer is active beforehand.
A sound can be attached to the event by setting the Sound ID.
Lava
The LAVA event causes the player to take damage when walked over.
The amount of damage is specified in the assets/source/stats/progression.tsv file.
Light
The LIGHT event changes the ambient lighting.
The color name can be set in the Item ID attribute. If the Item ID is empty, the color reverts back to the map's default lighting.
Secret
The SECRET event indicates a secret area.
There should be one secret event per secret area, as the number of secrets a level has is determined by the total event count.
Sound
The SOUND event plays a sound.
Set the sound in the Sound ID attribute. A sound will play at every Event Tile location.
Spawn
The SPAWN event spawns monsters or items.
The Monster ID determines which monster spawns. An item will also spawn if Item ID is set.
Event tiles must be set for spawning to work. An optional particle will be created if the Particle ID is set.
The Level determines how many objects to spawn, and the Period determines the time between spawns (including first spawn). Right-clicking the Period icons updates the period by 0.1 instead of 1. Holding Shift multiplies the change by 5.

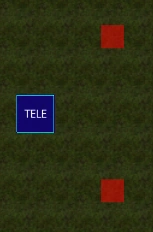
Teleport
The TELE event moves the player to a new position.
The player will teleport to the associated event tile, or a random tile if multiple ones are used.
Text
The TEXT event displays a text message.
The list of messages is stored in the assets/source/stats/text.tsv file.
A Level of 0 means the event can be triggered indefinitely. The Period determines how long the message appears for.
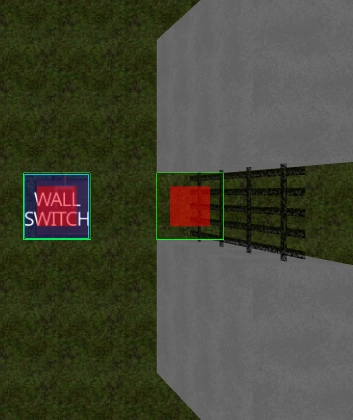
Wall Switch
The WALL SWITCH event modifies blocks when the player presses the Use key.
The Wall Switch event works similarly to the Door event, but the first block's collision flag does not change, since that's where the actual switch block should be.
Editing Tips
- Always use spawn events to create monsters. This ensures progression multipliers and random modifiers are applied.
- Blocks can be moved to different layers by clicking the Layer Up and Layer Down buttons.
- Walls with a Min Z of 0.5 or higher block movement and vision, but allow bullets to pass.
Reference
3D Viewport
Left-click creates objects, blocks and eventsMiddle-click selects or moves objects, blocks, and events
Shift+Middle-click adds a block to the selection
Ctrl+Middle-click removes a block from the selection
Right-click pans the camera around
Holding Shift while placing or moving objects aligns them to the grid
Scroll Wheel zooms in and out
Shift+Scroll Wheel zooms in and out faster
Ctrl+Scroll Wheel changes Max Z for selected blocks
Shift+Ctrl+Scroll Wheel changes Min Z for selected blocks
Ctrl+Scroll Wheel changes scale for selected props by 0.05
Shift+Ctrl+Scroll Wheel changes scale for selected props by 0.5
Palette Window
Scroll Wheel scrolls the palette up and downTab selects the next item
Shift+Tab selects the previous item
Command Window
Right-clicking the Period icons changes period by 0.1Holding Shift while clicking the Level or Period icons multiplies the change by 5
Scroll Wheel changes object level or event spawn level
Shift+Scroll Wheel changes object level or event spawn level by 5
Hotkeys
Ctrl+N creates a new mapN sets the map name
Shift+A sets the map's ambient lighting color for indoor maps
Shift+F sets the map's fog color
L loads a map
S saves the map
T tests the map
Shift+T tests the map and place player at mouse position
O toggles the map's ambient lighting to be inside or outside
1 switches to Block mode
2 switches to Event mode
3 switches to Item mode
4 switches to Monster mode
5 switches to Prop mode
F1 selects the Base layer
F2 selects the first Floor layer
F3 selects the second Floor layer
F4 selects the third Floor layer
F5 selects the Foreground layer
W selects the Wall layer
F selects the Flat Wall layer
Grave deselects
D deletes selected objects, blocks, or events
X splits the selected block
Shift+X splits the selected square block vertically
C copies selected objects, blocks, or events
V pastes copied objects, blocks, or events
B toggles the highlighting of block boundaries in the current layer
V applies copied color and texture to selected blocks
Shift+V applies copied color to selected blocks
Ctrl+V applies copied texture to selected blocks
G increases grid spacing
Shift+G decreases grid spacing
Ctrl+G toggles the grid
Page Up increases the map level
Page Down decreases the map level
- decreases the checkpoint level for testing
= increases the checkpoint level for testing
Arrow Keys increases selected block or event size
Shift+Arrow Keys decreases selected block or event size
Shift+C sets a block's color
A toggles the walkable state of a block or active state of an event
R rotates a block's texture
M mirrors a block's texture
Keypad Plus increases a block's maximum z value
Keypad Minus decreases a block's maximum z value
Shift+Keypad Plus increases a block's minimum z value
Shift+Keypad Minus decreases a block's minimum z value
Spacebar toggles an event tile
Shift+Spacebar adds an event tile
Ctrl+Spacebar removes an event tile
Shift+I sets the item id for an event
Shift+M sets the monster id for an event
Shift+P sets the particle id for an event
Shift+S sets the sound id for an event